
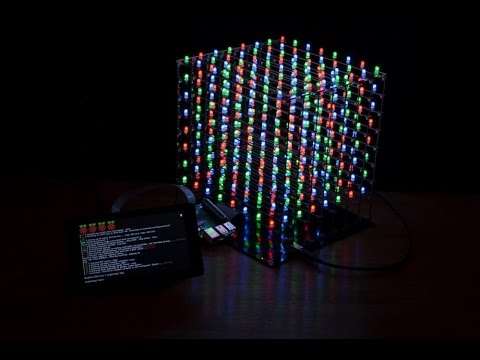
Le cube LED ci-dessus [VoxCube] est contrôlé via un Raspberry Pi, en utilisant python et l’affichage officiel Raspberry Pi.
Les boutons ont été configurés à l’aide du Kivy. Kivy est une bibliothèque Python qui facilite la création de boutons et d’événements avec un écran tactile.
Ici est un très bon guide sur la façon d’installer Kivy sur un Raspberry Pi.
Voici une résumé de ce que j’ai fait pour faire avancer Kivy ;
pi@raspberrypi ~ $ git clone https://github.com/mwilliams03/BerryIMU.git
pi@raspberrypi ~ $ sudo apt-get mise à jour
pi@raspberrypi ~ $ sudo nano /etc/apt/sources.list
Ajoutez le texte ci-dessous au bas du fichier ;
deb http://vontaene.de/raspbian-updates/ . main
pi@raspberrypi ~ $ gpg –keyserver pgp.mit.edu –recv-keys 0C667A3E
pi@raspberrypi ~ $ gpg -a –export 0C667A3E | sudo apt-key ajouter –
pi@raspberrypi ~ $ sudo apt-get -y install pkg-config libgl1-mesa-dev libgles2-mesa-dev python-pygame python-setuptools libgstreamer1.0-dev git-core gstreamer1.0-plugins-{bad,base, bon, moche} gstreamer1.0-{omx,alsa} python-dev
pi@raspberrypi ~ $ wget https://bootstrap.pypa.io/get-pip.py
pi@raspberrypi ~ $ sudo python get-pip.py
pi@raspberrypi ~ $ sudo apt-get install python-pip python-dev
pi@raspberrypi ~ $ wget http://pypi.python.org/packages/source/C/Cython/Cython-0.20.tar.gz
pi@raspberrypi ~ $ tar xvzf Cython-0.20.tar.gz Cython-0.20/
pi@raspberrypi ~ $ cd Cython-0.16/
pi@raspberrypi ~/Cython-0.16 $ sudo python setup.py install
pi@raspberrypi ~/Cython-0,16 $ cd ~
pi@raspberrypi ~ $ git clone https://github.com/kivy/kivy
pi@raspberrypi ~ $ cd kivy/
pi@raspberrypi ~/kivy$ python setup.py build
Le cube a un ATmega embarqué qui est utilisé pour contrôler les LED.
Le Raspberry Pi communique avec l’ATmega via l’interdiction de bits.
Une broche est utilisée pour informer l’ATmega d’afficher les LED.
Une autre broche est utilisée pour indiquer à l’ATmega de lire les valeurs des broches numériques RVB et LED sur le Raspberry Pi. L’image ci-dessous donne un aperçu de la manière dont cela est fait ; cliquez sur l’image pour une version plus grande

Le code ci-dessous a été utilisé ;
import kivy
kivy.require('1.0.6') # replace with your current kivy version !

from kivy.app import App
from kivy.uix.button import Button
from kivy.uix.togglebutton import ToggleButton
from kivy.uix.gridlayout import GridLayout
from kivy.uix.image import Image
from kivy.uix.slider import Slider
from kivy.clock import Clock
from kivy.graphics import Color, Rectangle

import RPi.GPIO as GPIO
import time
from math import cos,sin


PI = 3.14159265359
TOTALCUBES = 1
TOTAL_LEDS  = TOTALCUBES*512
SNAKE = 1
CUBE = 0
mode = CUBE
demo = 1

OUTPIN1 = 6		#GREEN
OUTPIN2 = 5		#GREEN
OUTPIN3 = 22	#GREEN
OUTPIN4 = 27	#GREEN
OUTPIN5 = 10	#GREEN

OUTPIN6 = 9		#RED
OUTPIN7 = 11	#RED
OUTPIN8 = 7		#RED
OUTPIN9 = 12	#RED
OUTPIN10 = 16	#RED

OUTPIN11 = 20	#BLUE
OUTPIN12 = 21	#BLUE
OUTPIN13 = 26	#BLUE
OUTPIN14 = 19	#BLUE
OUTPIN15 = 13

OUTPIN16 = 14	#LED Number
OUTPIN17 = 23	#LED Number
OUTPIN18 = 24	#LED Number
OUTPIN19 = 25	#LED Number
OUTPIN20 = 8	#LED Number
OUTPIN21 = 1	#LED Number
OUTPIN22 = 4	#LED Number
OUTPIN23 = 3	#LED Number


OUTPIN24 = 2  #reset
OUTPIN25 = 15 # RXD
OUTPIN26 = 0

SENDING  = 17
SHOW = 18


#used to color snake
sine30_3   = [
[18,	29,	0],
[21,	28,	0],
[23,	27,	0],
[26,	25,	0],
[27,	22,	0],
[29,	19,	0],
[29,	16,	0],
[29,	13,	0],
[29,	10,	0],
[27,	7,	2],
[26,	4,	3],
[23,	2,	6],
[21,	1,	8],
[18,	0,	11],
[15,	0,	15],
[11,	0,	16],
[8,	1,	17],
[6,	2,	18],
[3,	4,	17],
[2,	7,	16],
[0,	10,	15],
[0,	13,	12],
[0,	15,	9],
[0,	18,	6],
[0,	21,	4],
[0,	23,	5],
[0,	26,	11],
[0,	27,	15],
[0,	29,	15],
[0,	29,	15],
[0,	29,	8]]


cubePosition = [[3,3,3],[4,3,3],[3,4,3],[4,4,3],[3,3,4],[4,3,4],[3,4,4],[4,4,4]]							#Cube has 8 LEDs.  Each array element is XYZ
snakePosition = [[3,3,3],[0,0,0],[0,0,0],[0,0,0],[0,0,0],[0,0,0],[0,0,0],[0,0,0],[0,0,0],[0,0,0],[0,0,0]]	#Array used for snake. Each elements XYZ

Cposition  = 0

def showLED():                      #used to show LED updates to cube

    GPIO.output(SHOW, GPIO.LOW)
    time.sleep(0.03)
    GPIO.output(SHOW, GPIO.HIGH)
    time.sleep(0.02)


def updateLed(LEDnumber,r,g,b):		#Converts all the needed data to a 16 bit value that gets sent to the cube.
    combinedData = 0;
    combinedData = r;
    combinedData += g <<5;
    combinedData += b <<10;

    combinedData += LEDnumber << 15; send16bites(combinedData,30); def updateLEDGrid(x, y, z, r, g, b): #Update LEDs based on grid coordinates rather than just LED number show = 1; if (x>7 or x<0) : #These lines make sure that we only light a LED within the CUBE show = 0 if(y>7 or y<0): show = 0 if(z>((TOTALCUBES*8)-1) or z<0): show = 0; if(show==1): LEDnumber = 0; if (y % 2): #Every second Y horizontal is in reverse x = 7-x LEDnumber = x + (y * 8) + (z * 64) updateLed(LEDnumber,r,g,b) def send16bites(data, sendDelay): GPIO.output(OUTPIN1, GPIO.HIGH) if ((data >> 0)  & 0x01) else GPIO.output(OUTPIN1, GPIO.LOW)
    GPIO.output(OUTPIN2, GPIO.HIGH) if ((data >> 1)  & 0x01) else GPIO.output(OUTPIN2, GPIO.LOW)
    GPIO.output(OUTPIN3, GPIO.HIGH) if ((data >> 2)  & 0x01) else GPIO.output(OUTPIN3, GPIO.LOW)
    GPIO.output(OUTPIN4, GPIO.HIGH) if ((data >> 3)  & 0x01) else GPIO.output(OUTPIN4, GPIO.LOW)
    GPIO.output(OUTPIN5, GPIO.HIGH) if ((data >> 4)  & 0x01) else GPIO.output(OUTPIN5, GPIO.LOW)
    GPIO.output(OUTPIN6, GPIO.HIGH) if ((data >> 5)  & 0x01) else GPIO.output(OUTPIN6, GPIO.LOW)
    GPIO.output(OUTPIN7, GPIO.HIGH) if ((data >> 6)  & 0x01) else GPIO.output(OUTPIN7, GPIO.LOW)
    GPIO.output(OUTPIN8, GPIO.HIGH) if ((data >> 7)  & 0x01) else GPIO.output(OUTPIN8, GPIO.LOW)
    GPIO.output(OUTPIN9, GPIO.HIGH) if ((data >> 8)  & 0x01) else GPIO.output(OUTPIN9, GPIO.LOW)
    GPIO.output(OUTPIN10, GPIO.HIGH) if ((data >> 9)  & 0x01) else GPIO.output(OUTPIN10, GPIO.LOW)
    GPIO.output(OUTPIN11, GPIO.HIGH) if ((data >> 10)  & 0x01) else GPIO.output(OUTPIN11, GPIO.LOW)
    GPIO.output(OUTPIN12, GPIO.HIGH) if ((data >> 11)  & 0x01) else GPIO.output(OUTPIN12, GPIO.LOW)
    GPIO.output(OUTPIN13, GPIO.HIGH) if ((data >> 12)  & 0x01) else GPIO.output(OUTPIN13, GPIO.LOW)
    GPIO.output(OUTPIN14, GPIO.HIGH) if ((data >> 13)  & 0x01) else GPIO.output(OUTPIN14, GPIO.LOW)
    GPIO.output(OUTPIN15, GPIO.HIGH) if ((data >> 14)  & 0x01) else GPIO.output(OUTPIN15, GPIO.LOW)

    GPIO.output(OUTPIN16, GPIO.HIGH) if ((data >> 15)  & 0x01) else GPIO.output(OUTPIN16, GPIO.LOW)
    GPIO.output(OUTPIN17, GPIO.HIGH) if ((data >> 16)  & 0x01) else GPIO.output(OUTPIN17, GPIO.LOW)
    GPIO.output(OUTPIN18, GPIO.HIGH) if ((data >> 17)  & 0x01) else GPIO.output(OUTPIN18, GPIO.LOW)
    GPIO.output(OUTPIN19, GPIO.HIGH) if ((data >> 18)  & 0x01) else GPIO.output(OUTPIN19, GPIO.LOW)
    GPIO.output(OUTPIN20, GPIO.HIGH) if ((data >> 19)  & 0x01) else GPIO.output(OUTPIN20, GPIO.LOW)
    GPIO.output(OUTPIN21, GPIO.HIGH) if ((data >> 20)  & 0x01) else GPIO.output(OUTPIN21, GPIO.LOW)
    GPIO.output(OUTPIN22, GPIO.HIGH) if ((data >> 21)  & 0x01) else GPIO.output(OUTPIN22, GPIO.LOW)
    GPIO.output(OUTPIN23, GPIO.HIGH) if ((data >> 22)  & 0x01) else GPIO.output(OUTPIN23, GPIO.LOW)
    GPIO.output(OUTPIN24, GPIO.HIGH) if ((data >> 23)  & 0x01) else GPIO.output(OUTPIN24, GPIO.LOW)
    GPIO.output(OUTPIN25, GPIO.HIGH) if ((data >> 24)  & 0x01) else GPIO.output(OUTPIN25, GPIO.LOW)
    GPIO.output(OUTPIN26, GPIO.HIGH) if ((data >> 25)  & 0x01) else GPIO.output(OUTPIN26, GPIO.LOW)
    GPIO.output(SENDING, GPIO.LOW)

    GPIO.output(SENDING, GPIO.HIGH)


#setup GPIO pins
GPIO.setmode(GPIO.BCM)

GPIO.setup(OUTPIN1, GPIO.OUT)
GPIO.setup(OUTPIN2, GPIO.OUT)
GPIO.setup(OUTPIN3, GPIO.OUT)
GPIO.setup(OUTPIN4, GPIO.OUT)
GPIO.setup(OUTPIN5, GPIO.OUT)
GPIO.setup(OUTPIN6, GPIO.OUT)
GPIO.setup(OUTPIN7, GPIO.OUT)
GPIO.setup(OUTPIN8, GPIO.OUT)
GPIO.setup(OUTPIN9, GPIO.OUT)
GPIO.setup(OUTPIN10, GPIO.OUT)
GPIO.setup(OUTPIN11, GPIO.OUT)
GPIO.setup(OUTPIN12, GPIO.OUT)
GPIO.setup(OUTPIN13, GPIO.OUT)
GPIO.setup(OUTPIN14, GPIO.OUT)
GPIO.setup(OUTPIN15, GPIO.OUT)
GPIO.setup(OUTPIN16, GPIO.OUT)
GPIO.setup(OUTPIN17, GPIO.OUT)
GPIO.setup(OUTPIN18, GPIO.OUT)
GPIO.setup(OUTPIN19, GPIO.OUT)
GPIO.setup(OUTPIN20, GPIO.OUT)
GPIO.setup(OUTPIN21, GPIO.OUT)
GPIO.setup(OUTPIN22, GPIO.OUT)
GPIO.setup(OUTPIN23, GPIO.OUT)
GPIO.setup(OUTPIN24, GPIO.OUT)
GPIO.setup(OUTPIN25, GPIO.OUT)
GPIO.setup(OUTPIN26, GPIO.OUT)

GPIO.setup(SENDING, GPIO.OUT)
GPIO.setup(SHOW, GPIO.OUT)


GPIO.output(OUTPIN1, GPIO.LOW)
GPIO.output(OUTPIN2, GPIO.LOW)
GPIO.output(OUTPIN3, GPIO.LOW)
GPIO.output(OUTPIN4, GPIO.LOW)
GPIO.output(OUTPIN5, GPIO.LOW)
GPIO.output(OUTPIN6, GPIO.LOW)
GPIO.output(OUTPIN7, GPIO.LOW)
GPIO.output(OUTPIN8, GPIO.LOW)
GPIO.output(OUTPIN9, GPIO.LOW)
GPIO.output(OUTPIN10, GPIO.LOW)
GPIO.output(OUTPIN11, GPIO.LOW)
GPIO.output(OUTPIN12, GPIO.LOW)
GPIO.output(OUTPIN13, GPIO.LOW)
GPIO.output(OUTPIN14, GPIO.LOW)
GPIO.output(OUTPIN15, GPIO.LOW)
GPIO.output(OUTPIN16, GPIO.LOW)
GPIO.output(OUTPIN17, GPIO.LOW)
GPIO.output(OUTPIN18, GPIO.LOW)
GPIO.output(OUTPIN19, GPIO.LOW)
GPIO.output(OUTPIN20, GPIO.LOW)
GPIO.output(OUTPIN21, GPIO.LOW)
GPIO.output(OUTPIN22, GPIO.LOW)
GPIO.output(OUTPIN23, GPIO.LOW)
GPIO.output(OUTPIN24, GPIO.LOW)
GPIO.output(OUTPIN25, GPIO.LOW)
GPIO.output(OUTPIN26, GPIO.LOW)

GPIO.output(SENDING, GPIO.HIGH)
GPIO.output(SHOW, GPIO.HIGH)


def updateCube():	#Update cube with either a snake or a small 2x2x2 cube.
	for i in range(0, TOTAL_LEDS):
		updateLed(i,0,0,0)

	if mode == CUBE:
		for i in range(0, 8):
			updateLEDGrid(cubePosition[ i][0],cubePosition[ i][1],cubePosition[ i][2],sine30_3[Cposition][0],sine30_3[Cposition][1],sine30_3[Cposition][2])
	elif mode == SNAKE:
		for i in range(11):
			updateLEDGrid(snakePosition[ i][0],snakePosition[ i][1],snakePosition[ i][2],sine30_3[(i*2)+8][0],sine30_3[(i*2)+8][1],sine30_3[(i*2)+8][2])
		a = [1,2,3,4,5,6,7,8,9,10]
		for i in reversed(a):				#this cycles the last coordinates through the snake to create the tail.
			snakePosition[ i][0] = snakePosition[i-1][0]
			snakePosition[ i][1] = snakePosition[i-1][1]
			snakePosition[ i][2] = snakePosition[i-1][2]
	showLED()


def circle(x, y, z,rad, r,  g,  b):
	for angle in frange(0.0,2*PI,1):
		updateLEDGrid(int(x + rad*cos(angle)),int(y + rad*sin(angle)),z,r,g,b);
	showLED()

def boom():			#Create an expanding sphere. E.g. explosion
	for rad in frange(1,11,1):
		sphere(cubePosition[0][0]+1,cubePosition[0][1]+1,cubePosition[0][2]+1,rad,sine30_3[Cposition][0],sine30_3[Cposition][1],sine30_3[Cposition][2])
		for i in range(0, 8):
			updateLEDGrid(cubePosition[ i][0],cubePosition[ i][1],cubePosition[ i][2],sine30_3[Cposition][0],sine30_3[Cposition][1],sine30_3[Cposition][2])
		showLED()
		for x in range(0, TOTAL_LEDS):
			updateLed(x,0,0,0)


def sphere( x,  y,  z, rad, r,  g,  b):
	for sph in frange(0.0,PI,0.8):
		for angle in frange(0.0,2*PI,0.3):
			updateLEDGrid(int(x + rad*cos(angle)*sin(sph)),int(y + rad*sin(angle)*sin(sph)),int(z + rad*cos(sph)),r,g,b)


def frange(start, stop, step):
	angle = start
	while angle < stop: yield angle angle += step def demo1(): #Fill cube with every 3rd LED being red, green or blue. for x in range(0, TOTAL_LEDS): updateLed(x,0,0,0) leds = [ i for i in range(TOTAL_LEDS)] LEDs1 = leds[::3] LEDs2 = leds[1::3] LEDs3 = leds[2::3] for x in range(0,len(LEDs3)): updateLed(LEDs1[x],15,0,0) updateLed(LEDs2[x],0,15,0) updateLed(LEDs3[x],0,0,15) showLED(); def demo2(): #Fade all LEDs, red, green then blue. for i in range(0, TOTAL_LEDS): updateLed(i,0,0,0) for h in range(0, 15,3): print "h= %d" % h for i in range(0,TOTAL_LEDS): updateLed(i,h,0,0) showLED(); for h in range(15, -1,-3): print "h= %d" % h for i in range(0,TOTAL_LEDS): updateLed(i,h,0,0) showLED(); for h in range(0, 15,3): print "h= %d" % h for i in range(0,TOTAL_LEDS): updateLed(i,0,h,0) showLED(); for h in range(15, -1,-3): print "h= %d" % h for i in range(0,TOTAL_LEDS): updateLed(i,0,h,0) showLED() for h in range(0, 15,3): print "h= %d" % h for i in range(0,TOTAL_LEDS): updateLed(i,0,0,h) showLED() for h in range(15, -1,-3): print "h= %d" % h for i in range(0,TOTAL_LEDS): updateLed(i,0,0,h) showLED() def demo3(): #Create a red and blue plan that scroll across cube xx = 0; for i in range(0, TOTAL_LEDS): updateLed(i,0,0,0) for z in range(0, (TOTALCUBES*8)): for y in range(0, 8): for x in range(0, 8): updateLEDGrid(x,y,z,0,0,30) for zz in range (0,16): for yy in range (0,8): updateLEDGrid(xx,yy,zz,0,30,0) xx+=1 if xx > 7:
			xx=0

		showLED()
		for i in range(0, TOTAL_LEDS):
			updateLed(i,0,0,0)
	xx=7
	for z in range((TOTALCUBES*8)-1, -1,-1):
		for y in range(0, 8):
			for x in range(0, 8):
				updateLEDGrid(x,y,z,0,0,30)
		for zz in range (0,16):
			for yy in range (0,8):
				updateLEDGrid(xx,yy,zz,0,30,0)
		xx-=1
		if xx < 0: xx=7 showLED() print "z = %d" % z for i in range(0, TOTAL_LEDS): updateLed(i,0,0,0) xx = 0; def press_callback(obj): global Cposition global mode global demo if obj.text == 'left': print("Left") if mode == CUBE: if cubePosition[0][0]>0:
				for i in range(0, 8):
					cubePosition[ i][0]-=1
		elif mode == SNAKE:
			if snakePosition[0][0]>0:
				snakePosition[0][0]-=1
		updateCube()

	if obj.text == 'right':
		print("Right")
		if mode == CUBE:
			if cubePosition[0][0]<6:
				for i in range(0, 8):
					cubePosition[ i][0]+=1
		elif mode == SNAKE:
			if snakePosition[0][0]<7:
				snakePosition[0][0]+=1
		updateCube()
	if obj.text == 'up':
		print("Up")
		if mode == CUBE:
			if cubePosition[0][1]<6:
				for i in range(0, 8):
					cubePosition[ i][1]+=1
		elif mode == SNAKE:
			if snakePosition[0][1]<7: snakePosition[0][1]+=1 updateCube() if obj.text == 'down': print("Down") if mode == CUBE: if cubePosition[0][1]>0:
				for i in range(0, 8):
					cubePosition[ i][1]-=1
		elif mode == SNAKE:
			if snakePosition[0][1]>0:
				snakePosition[0][1]-=1
		updateCube()


	if obj.text == 'back':
		print("Back")
		if mode == CUBE:
			if cubePosition[0][2]<(TOTALCUBES*8)-2:
				for i in range(0, 8):
					cubePosition[ i][2]+=1
		elif mode == SNAKE:
			if snakePosition[0][2]<(TOTALCUBES*8)-1: snakePosition[0][2]+=1 updateCube() if obj.text == 'forward': print("Forward") if mode == CUBE: if cubePosition[0][2]>0:
				for i in range(0, 8):
					cubePosition[ i][2]-=1
		elif mode == SNAKE:
			if snakePosition[0][2]>0:
				snakePosition[0][2]-=1
		updateCube()
	if obj.text == 'boom':
		print("Boom")
		boom()
		updateCube()
	if obj.text == '   LEDn  colour ':
		print("LED Colour")
		if Cposition < len(sine30_3)-1:
			Cposition+=1
		else:
			Cposition = 0
		updateCube()
	if obj.text == 'clear':
		print("Clear")
		for x in range(0, TOTAL_LEDS):
			updateLed(x,0,0,0)
		showLED()

	if obj.text == 'mode':
		print("Mode")
		if mode == SNAKE:
			mode = CUBE
		else:
			mode = SNAKE
		updateCube()

	if obj.text == 'demo1':
		print("Demo1")
		demo1()

	if obj.text == 'demo2':
		print("Demo2")
		demo2()

	if obj.text == 'demo3':
		print("Demo3")
		demo3()


class MyApp(App):

	def build(self):

		layout = GridLayout(size=(600,800), size_hint=(None, None))

		#Create our buttons
		leftButton = Button(text="left",font_size=40,pos=(100,200),background_color=(.6,2,1,1))
		rightButton = Button(text="right",font_size=40,pos=(200,200),background_color=(.6,2,1,1)  )
		upButton = Button(text="up",font_size=40,pos=(150,300),background_color=(.6,2,1,1)  )
		downButton = Button(text="down",font_size=40,pos=(150,100),background_color=(.6,2,1,1)  )
		backButton = Button(text="back",font_size=40,pos=(350,300),background_color=(.6,1,2,1) )
		forwardButton = Button(text="forward",font_size=40,pos=(300,100),size=(200,100),background_color=(.6,1,2,1) )
		LEDcolourButton = Button(text="   LEDn  colour ",pos=(650,300),font_size=30,background_color=(1,0,0,1) )
		boomButton = Button(text="boom",pos=(650,200),font_size=30,background_color=(1,0,0,1) )
		clearButton = Button(text="clear",pos=(650,30),font_size=30,background_color=(1,0,0,1) )
		modeButton = Button(text="mode",pos=(520,30),font_size=30,background_color=(1,1,0,1) )
		demo1Button = Button(text="demo1",pos=(520,130),font_size=30,background_color=(1,1,0,1) )
		demo2Button = Button(text="demo2",pos=(520,230),font_size=30,background_color=(1,1,0,1) )
		demo3Button = Button(text="demo3",pos=(520,330),font_size=30,background_color=(1,1,0,1) )

		#Bind the call backs
		leftButton.bind(on_press=press_callback)
		rightButton.bind(on_press=press_callback)
		upButton.bind(on_press=press_callback)
		downButton.bind(on_press=press_callback)
		backButton.bind(on_press=press_callback)
		forwardButton.bind(on_press=press_callback)
		LEDcolourButton.bind(on_press=press_callback)
		boomButton.bind(on_press=press_callback)
		clearButton.bind(on_press=press_callback)
		modeButton.bind(on_press=press_callback)
		demo1Button.bind(on_press=press_callback)
		demo2Button.bind(on_press=press_callback)
		demo3Button.bind(on_press=press_callback)


		#Add the widgets
		layout.add_widget(leftButton)
		layout.add_widget(rightButton)
		layout.add_widget(upButton)
		layout.add_widget(downButton)
		layout.add_widget(backButton)
		layout.add_widget(forwardButton)
		layout.add_widget(LEDcolourButton)
		layout.add_widget(boomButton)
		layout.add_widget(clearButton)
		layout.add_widget(modeButton)
		layout.add_widget(demo1Button)
		layout.add_widget(demo2Button)
		layout.add_widget(demo3Button)


		return layout

if __name__ == '__main__':
	MyApp().run()


for i in range(0,100):
	#for x in range(0, 1023):
	updateLed(1,13,13,13)
	showLED()

	showLED()

print "endn"
-
 sb components PiCube Cube 4 x 4 x 4 LED pour Raspberry Pi 4, 3, 2, Zero et A+ Assemblé (Vert)