

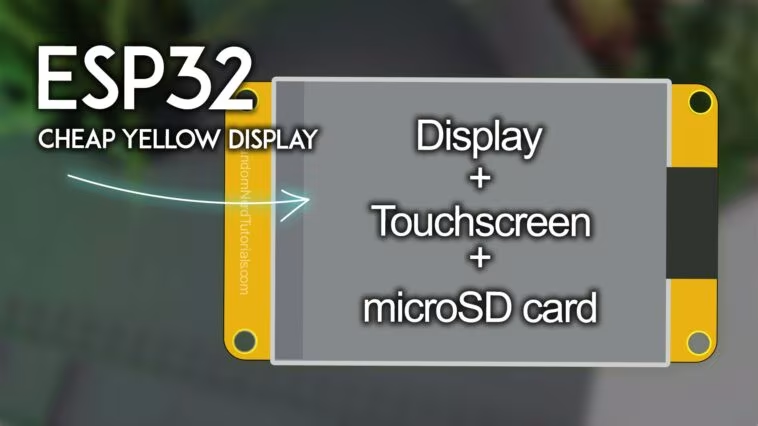
Dans ce guide, nous allons vous montrer comment utiliser simultanément l’écran, l’écran tactile et la carte microSD avec la carte ESP32 CYD (Cheap Yellow Display). Nous allons construire un exemple simple qui montre les points tactiles actuels sur l’écran tout en les enregistrant simultanément sur la carte microSD.
Bien qu’il s’agisse d’un exemple basique, il fournit une base solide pour comprendre comment combiner ces fonctionnalités. L’utilisation simultanée des trois fonctions sur la carte CYD n’est pas aussi simple qu’il y paraît en raison des limitations matérielles/bibliothèques liées au protocole de communication SPI. Cette approche a été testée sur l’ESP32-2432S028R – 2,8 pouces 240×320 avec un écran tactile résistif.
Nouveau sur la carte ESP32 CYD ? Commencez avec ce guide : Premiers pas avec le tableau d’affichage jaune bon marché ESP32 – CYD (ESP32-2432S028R).
Conditions préalables
Avant de continuer, assurez-vous de suivre les conditions préalables suivantes. Vous devez suivre toutes les étapes, sinon votre projet ne fonctionnera pas.
1) Installez les cartes ESP32 dans l’IDE Arduino

Nous allons programmer l’ESP32 à l’aide de l’IDE Arduino. Assurez-vous que les cartes ESP32 sont installées. Suivez le tutoriel suivant :
2) Installez les bibliothèques TFT et LVGL
LVGL (Light and Versatile Graphics Library) est une bibliothèque graphique gratuite et open source qui fournit une large gamme d’éléments graphiques faciles à utiliser pour vos projets de microcontrôleurs nécessitant une interface utilisateur graphique (GUI).

Suivez le didacticiel suivant pour installer et configurer les bibliothèques requises pour utiliser LVGL pour l’écran jaune bon marché ESP32 à l’aide de l’IDE Arduino.
La carte MicroSD et la communication SPI
Avant de plonger dans l’exemple, il est important de revoir quelques points clés concernant le protocole de communication SPI sur les cartes ESP32, en particulier la CYD.
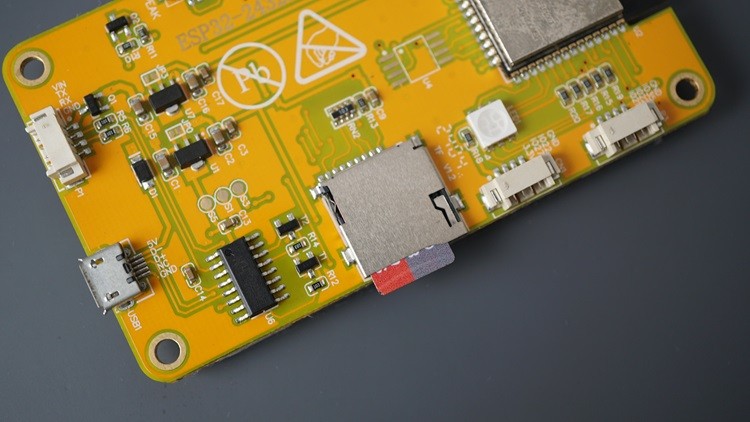
L’ESP32 prend en charge deux bus SPI distincts : VSPI et HSPI. Ce sont les broches par défaut pour VSPI et HSPI.
| IPS | MOSI | MISO | SCLK | CS |
| VSPI | GPIO23 | GPIO19 | GPIO18 | GPIO5 |
| HSPI | GPIO13 | GPIO12 | GPIO14 | GPIO15 |
Lecture recommandée : Communication SPI ESP32 : définir les broches, plusieurs interfaces de bus SPI et périphériques (Arduino IDE).
La carte microSD du CYD utilise les broches VSPI par défaut :
| Carte MicroSD | GPIO |
| MOSI | GPIO23 |
| MISO | GPIO19 |
| SCLK | GPIO18 |
| CS | GPIO5 |
Lecture recommandée : Guide ESP32 pour le module de carte MicroSD (Arduino IDE).
Bus SPI partagé
L’écran et l’écran tactile utilisent le protocole de communication SPI. Dans nos exemples, la bibliothèque d’affichage est configurée pour utiliser le bus HSPI, tandis que la bibliothèque d’écrans tactiles utilise le bus VSPI. Cela devient problématique car la carte microSD utilise également le bus VSPI (sur les broches matérielles par défaut), créant ainsi un conflit.
À première vue, cela ne semble pas poser de problème. Après tout, plusieurs appareils peuvent partager le même bus SPI si chacun possède sa propre broche CS (Chip Select).
CEPENDANT, le problème se pose avec l’écran tactile, qui écoute en permanence les événements tactiles. Le désactiver temporairement lors de l’accès à la carte microSD n’est pas idéal. De plus, de nombreux utilisateurs signalent que cette approche ne fonctionne pas de manière fiable.
Logiciel SPI pour l’écran tactile
Alors, que pouvons-nous faire à ce sujet ?
Nous savons que l’ESP32 permet l’utilisation du logiciel SPI (SoftSPI) sur toutes les broches disponibles. Pour résoudre le conflit, nous pouvons utiliser une version modifiée de la bibliothèque XPT2046_Touchscreen qui communique via SoftSPI au lieu du SPI matériel. Cela nous permet de séparer l’écran tactile du bus VSPI et d’éviter les conflits avec la carte microSD.
Téléchargez la bibliothèque XPT2046_TouchscreenSOFTSPI
Nous appellerons cette version modifiée de la bibliothèque XPT2046_TouchscreenSOFTSPI. Cette bibliothèque a également besoin de la bibliothèque SoftSPI, que nous installerons également localement.
Ce lien devrait télécharger un dossier .zip avec les fichiers suivants :
- XPT2046_TouchscreenSOFTSPI.cpp
- XPT2046_TouchscreenSOFTSPI.h
- SoftSPI.cpp
- SoftSPI.h
- Le croquis Arduino
Décompressez le dossier.
Déplacement des fichiers de bibliothèque vers le dossier Sketch
Le dossier précédent contient déjà tous les fichiers pour exécuter l’exemple. Cependant, si vous démarrez un projet à partir de zéro, vous devrez déplacer les fichiers de bibliothèque vers le dossier d’esquisse, comme nous l’expliquerons ensuite.
1) Ouvrez l’IDE Arduino. Enregistrez le dossier d’esquisse actuel (même s’il est vide). Fichier > Enregistrer sous… pour l’enregistrer à l’emplacement souhaité.
2) Allez dans Esquisse > Afficher le dossier d’esquisse. Cela ouvrira votre dossier de croquis actuel. Vous devez déplacer ces quatre fichiers de bibliothèque dans ce dossier.
3) Votre dossier de croquis Arduino devrait ressembler à ceci.
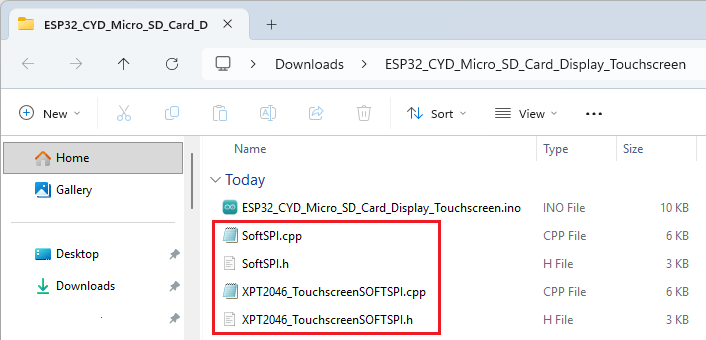
4) Après avoir déplacé les fichiers, redémarrez l’IDE Arduino.
Exemple de croquis (écran + écran tactile + carte MicroSD)
Après avoir tous les fichiers de bibliothèque requis dans le dossier de croquis, vous pouvez écrire votre croquis Arduino. C’est l’exemple que nous allons exécuter.
/*  Rui Santos & Sara Santos - Raspberryme.com - https://Raspberryme.com/esp32-cyd-display-touchscreen-microsd-card/
    THIS EXAMPLE WAS TESTED WITH THE FOLLOWING HARDWARE:
    1) ESP32-2432S028R 2.8 inch 240×320 also known as the Cheap Yellow Display (CYD): https://makeradvisor.com/tools/cyd-cheap-yellow-display-esp32-2432s028r/
      SET UP INSTRUCTIONS: https://Raspberryme.com/cyd-lvgl/
    2) REGULAR ESP32 Dev Board + 2.8 inch 240x320 TFT Display: https://makeradvisor.com/tools/2-8-inch-ili9341-tft-240x320/ and https://makeradvisor.com/tools/esp32-dev-board-wi-fi-bluetooth/
      SET UP INSTRUCTIONS: https://Raspberryme.com/esp32-tft-lvgl/
    Permission is hereby granted, free of charge, to any person obtaining a copy of this software and associated documentation files.
    The above copyright notice and this permission notice shall be included in all copies or substantial portions of the Software.
*/

#include
/*  Install the "TFT_eSPI" library by Bodmer to interface with the TFT Display - https://github.com/Bodmer/TFT_eSPI
    *** IMPORTANT: User_Setup.h available on the internet will probably NOT work with the examples available at Raspberryme.com ***
    *** YOU MUST USE THE User_Setup.h FILE PROVIDED IN THE LINK BELOW IN ORDER TO USE THE EXAMPLES FROM RANDOM NERD TUTORIALS ***
    FULL INSTRUCTIONS AVAILABLE ON HOW CONFIGURE THE LIBRARY: https://Raspberryme.com/cyd-lvgl/ or https://Raspberryme.com/esp32-tft-lvgl/   */
#include

// Copy the "XPT2046_TouchscreenSOFTSPI.h" library provided in the project page: https://Raspberryme.com/esp32-cyd-display-touchscreen-microsd-card/
#include

// Touchscreen pins
#define XPT2046_IRQ 36   // T_IRQ
#define XPT2046_MOSI 32  // T_DIN
#define XPT2046_MISO 39  // T_OUT
#define XPT2046_CLK 25   // T_CLK
#define XPT2046_CS 33    // T_CS

SoftSPI *tsSoftSpi;
// Set touch screen to use SOftSpi
XPT2046_TouchscreenSOFTSPI touchscreen(XPT2046_CS, XPT2046_IRQ);

/*  Install the "lvgl" library version 9.X by kisvegabor to interface with the TFT Display - https://lvgl.io/
    *** IMPORTANT: lv_conf.h available on the internet will probably NOT work with the examples available at Raspberryme.com ***
    *** YOU MUST USE THE lv_conf.h FILE PROVIDED IN THE LINK BELOW IN ORDER TO USE THE EXAMPLES FROM RANDOM NERD TUTORIALS ***
    FULL INSTRUCTIONS AVAILABLE ON HOW CONFIGURE THE LIBRARY: https://Raspberryme.com/cyd-lvgl/ or https://Raspberryme.com/esp32-tft-lvgl/   */
#include

#include "FS.h"
#include "SD.h"

// SD Reader pins (default VSPI pins)
#define SD_MISO  19
#define SD_MOSI  23
#define SD_SCK  18
#define SD_CS  5
SPIClass Sd_spi = SPIClass(VSPI);

#define SCREEN_WIDTH 240
#define SCREEN_HEIGHT 320

// Touchscreen coordinates: (x, y) and pressure (z)
int x, y, z;

#define DRAW_BUF_SIZE (SCREEN_WIDTH * SCREEN_HEIGHT / 10 * (LV_COLOR_DEPTH / 8))
uint32_t draw_buf[DRAW_BUF_SIZE / 4];

// If logging is enabled, it will inform the user about what is happening in the library
void log_print(lv_log_level_t level, const char * buf) {
  LV_UNUSED(level);
  Serial.println(buf);
  Serial.flush();
}

static lv_obj_t * text_label_touch;

void listDir(fs::FS &fs, const char * dirname, uint8_t levels){
  Serial.printf("Listing directory: %s\n", dirname);

  File root = fs.open(dirname);
  if(!root){
    Serial.println("Failed to open directory");
    return;
  }
  if(!root.isDirectory()){
    Serial.println("Not a directory");
    return;
  }

  File file = root.openNextFile();
  while(file){
    if(file.isDirectory()){
      Serial.print("  DIR : ");
      Serial.println(file.name());
      if(levels){
        listDir(fs, file.name(), levels -1);
      }
    } else {
      Serial.print("  FILE: ");
      Serial.print(file.name());
      Serial.print("  SIZE: ");
      Serial.println(file.size());
    }
    file = root.openNextFile();
  }
}

void createDir(fs::FS &fs, const char * path){
  Serial.printf("Creating Dir: %s\n", path);
  if(fs.mkdir(path)){
    Serial.println("Dir created");
  } else {
    Serial.println("mkdir failed");
  }
}

void removeDir(fs::FS &fs, const char * path){
  Serial.printf("Removing Dir: %s\n", path);
  if(fs.rmdir(path)){
    Serial.println("Dir removed");
  } else {
    Serial.println("rmdir failed");
  }
}

void readFile(fs::FS &fs, const char * path){
  Serial.printf("Reading file: %s\n", path);

  File file = fs.open(path);
  if(!file){
    Serial.println("Failed to open file for reading");
    return;
  }

  Serial.print("Read from file: ");
  while(file.available()){
    Serial.write(file.read());
  }
  file.close();
}

void writeFile(fs::FS &fs, const char * path, const char * message){
  Serial.printf("Writing file: %s\n", path);

  File file = fs.open(path, FILE_WRITE);
  if(!file){
    Serial.println("Failed to open file for writing");
    return;
  }
  if(file.print(message)){
    Serial.println("File written");
  } else {
    Serial.println("Write failed");
  }
  file.close();
}

void appendFile(fs::FS &fs, const char * path, const char * message){
  Serial.printf("Appending to file: %s\n", path);

  File file = fs.open(path, FILE_APPEND);
  if(!file){
    Serial.println("Failed to open file for appending");
    return;
  }
  if(file.print(message)){
      Serial.println("Message appended");
  } else {
    Serial.println("Append failed");
  }
  file.close();
}

void deleteFile(fs::FS &fs, const char * path){
  Serial.printf("Deleting file: %s\n", path);
  if(fs.remove(path)){
    Serial.println("File deleted");
  } else {
    Serial.println("Delete failed");
  }
}

// Get the Touchscreen data
void touchscreen_read(lv_indev_t * indev, lv_indev_data_t * data) {
  // Checks if Touchscreen was touched, and prints X, Y and Pressure (Z)
  if(touchscreen.tirqTouched() && touchscreen.touched(tsSoftSpi)) {
    // Get Touchscreen points
    TS_Point p = touchscreen.getPoint(tsSoftSpi);
    // Calibrate Touchscreen points with map function to the correct width and height
    x = map(p.x, 200, 3700, 1, SCREEN_WIDTH);
    y = map(p.y, 240, 3800, 1, SCREEN_HEIGHT);
    z = p.z;

    data->state = LV_INDEV_STATE_PRESSED;

    // Set the coordinates
    data->point.x = x;
    data->point.y = y;

    // Print Touchscreen info about X, Y and Pressure (Z) on the Serial Monitor
    Serial.print("X = ");
    Serial.print(x);
    Serial.print(" | Y = ");
    Serial.print(y);
    Serial.print(" | Pressure = ");
    Serial.print(z);
    Serial.println();
    String touch_data = "X = " + String(x) + "\nY = " + String(y) + "\nZ = " + String(z);
    lv_label_set_text(text_label_touch, touch_data.c_str());

    String sdMessage = String(x) + "," + String(y) + "," + String(z) + "\n";
    appendFile(SD, "/touch_points.txt", sdMessage.c_str());
  }
  else {
    data->state = LV_INDEV_STATE_RELEASED;
  }
}

void lv_create_main_gui(void) {
  // Create a text label aligned center: https://docs.lvgl.io/master/widgets/label.html
  text_label_touch = lv_label_create(lv_screen_active());
  lv_label_set_text(text_label_touch, "Touch screen to test");
  lv_obj_align(text_label_touch, LV_ALIGN_CENTER, 0, 0);

  // Set font type and size. More information: https://docs.lvgl.io/master/overview/font.html
  static lv_style_t style_text_label;
  lv_style_init(&style_text_label);
  lv_style_set_text_font(&style_text_label, &lv_font_montserrat_18);
  lv_obj_add_style(text_label_touch, &style_text_label, 0);
}

void setup() {
  Serial.begin(115200);
  String LVGL_Arduino = String("LVGL Library Version: ") + lv_version_major() + "." + lv_version_minor() + "." + lv_version_patch();

  while (!Serial && (millis() <= 1500));
  delay (1000);

  Serial.println(LVGL_Arduino);

  Serial.print("\nInitializing SD card...\n");

  Sd_spi.begin(SD_SCK, SD_MISO, SD_MOSI, SD_CS);

  if (!SD.begin(SD_CS, Sd_spi, 55000000)) {
    Serial.println("Card Mount Failed");
  }

  uint8_t cardType = SD.cardType();

  if(cardType == CARD_NONE){
    Serial.println("No SD card attached");
    return;
  }

  Serial.print("SD Card Type: ");
  if(cardType == CARD_MMC){
    Serial.println("MMC");
  } else if(cardType == CARD_SD){
    Serial.println("SDSC");
  } else if(cardType == CARD_SDHC){
    Serial.println("SDHC");
  } else {
    Serial.println("UNKNOWN");
  }

  uint64_t cardSize = SD.cardSize() / (1024 * 1024);
  Serial.printf("SD Card Size: %lluMB\n", cardSize);

  listDir(SD, "/", 0);

  // If the touch_points.txt file doesn't exist, create a file on the SD card and write the header
  File file = SD.open("/touch_points.txt");
  if(!file) {
    Serial.println("touch_points.txt file doesn't exist");
    Serial.println("Creating file...");
    writeFile(SD, "/touch_points.txt", "x,y,z\r\n");
  }
  else {
    Serial.println("touch_points.txt file already exists");
  }
  file.close();

  lv_init();
  // Register print function for debugging
  lv_log_register_print_cb(log_print);

  // Create a Softspi Object and set its SPI pins
  tsSoftSpi = new SoftSPI (XPT2046_MOSI, XPT2046_MISO, XPT2046_CLK);

  // Start the SPI for the touchscreen and init the touchscreen
  touchscreen.begin(tsSoftSpi);

  // Set the Touchscreen rotation in landscape mode
  // Note: in some displays, the touchscreen might be upside down, so you might need to set the rotation to 0: touchscreen.setRotation(0);
  touchscreen.setRotation(2);

  // Create a display object
  lv_display_t * disp;
  // Initialize the TFT display using the TFT_eSPI library
  disp = lv_tft_espi_create(SCREEN_WIDTH, SCREEN_HEIGHT, draw_buf, sizeof(draw_buf));
  lv_display_set_rotation(disp, LV_DISPLAY_ROTATION_270);

  // Initialize an LVGL input device object (Touchscreen)
  lv_indev_t * indev = lv_indev_create();
  lv_indev_set_type(indev, LV_INDEV_TYPE_POINTER);

  // Set the callback function to read Touchscreen input
  lv_indev_set_read_cb(indev, touchscreen_read);

  lv_create_main_gui();
}

void loop() {
  lv_task_handler();  // let the GUI do its work
  lv_tick_inc(5);     // tell LVGL how much time has passed
  delay(5);           // let this time pass
 }
Afficher le code brut
Comment fonctionne le code ?
Ce code n’est pas très différent de l’exemple de ce tutoriel précédent.
Nous venons d’ajouter les lignes de code pour s’interfacer avec la carte microSD, sauvegarder les points de contact et initialiser l’écran tactile à l’aide de la bibliothèque modifiée.
Nous examinerons les parties pertinentes du code pour montrer comment utiliser simultanément l’écran, l’écran tactile et la carte microSD,
Importez la bibliothèque XPT2046_TouchscreenSOFTSPI
Nous importons la version modifiée de la bibliothèque tactile :
#include Créer une instance SoftSPI
Nous créons une nouvelle instance de SoftSPI pour initialiser l’écran tactile via le logiciel au lieu du matériel VSPI plus tard.
SoftSPI *tsSoftSpi;Créer un objet à écran tactile
Nous créons un nouvel objet tactile en utilisant la version modifiée de la bibliothèque.
XPT2046_TouchscreenSOFTSPI touchscreen(XPT2046_CS, XPT2046_IRQ);Importer des bibliothèques pour la carte MicroSD
Nous importons les bibliothèques FS et SD, nécessaires à la gestion des fichiers sur la carte microSD.
#include "FS.h"
#include "SD.h"
Broches et bus SPI de la carte MicroSD
Nous définissons les broches de la carte microSD (broches VSPI par défaut) et créons une nouvelle instance SPI sur VSPI avec ces broches.
#define SD_MISO  19
#define SD_MOSI  23
#define SD_SCK  18
#define SD_CS  5
SPIClass Sd_spi = SPIClass(VSPI);
Fonctions de la carte MicroSD
On dispose alors de plusieurs fonctions définies pour interagir avec la carte microSD. Nous ne les utiliserons pas tous, mais nous les laissons dans cet exemple afin que vous sachiez quelles fonctions sont disponibles. Les noms des fonctions sont assez explicites.
void listDir(fs::FS &fs, const char * dirname, uint8_t levels){
  Serial.printf("Listing directory: %s\n", dirname);

  File root = fs.open(dirname);
  if(!root){
    Serial.println("Failed to open directory");
    return;
  }
  if(!root.isDirectory()){
    Serial.println("Not a directory");
    return;
  }

  File file = root.openNextFile();
  while(file){
    if(file.isDirectory()){
      Serial.print("  DIR : ");
      Serial.println(file.name());
      if(levels){
        listDir(fs, file.name(), levels -1);
      }
    } else {
      Serial.print("  FILE: ");
      Serial.print(file.name());
      Serial.print("  SIZE: ");
      Serial.println(file.size());
    }
    file = root.openNextFile();
  }
}

void createDir(fs::FS &fs, const char * path){
  Serial.printf("Creating Dir: %s\n", path);
  if(fs.mkdir(path)){
    Serial.println("Dir created");
  } else {
    Serial.println("mkdir failed");
  }
}

void removeDir(fs::FS &fs, const char * path){
  Serial.printf("Removing Dir: %s\n", path);
  if(fs.rmdir(path)){
    Serial.println("Dir removed");
  } else {
    Serial.println("rmdir failed");
  }
}

void readFile(fs::FS &fs, const char * path){
  Serial.printf("Reading file: %s\n", path);

  File file = fs.open(path);
  if(!file){
    Serial.println("Failed to open file for reading");
    return;
  }

  Serial.print("Read from file: ");
  while(file.available()){
    Serial.write(file.read());
  }
  file.close();
}

void writeFile(fs::FS &fs, const char * path, const char * message){
  Serial.printf("Writing file: %s\n", path);

  File file = fs.open(path, FILE_WRITE);
  if(!file){
    Serial.println("Failed to open file for writing");
    return;
  }
  if(file.print(message)){
    Serial.println("File written");
  } else {
    Serial.println("Write failed");
  }
  file.close();
}

void appendFile(fs::FS &fs, const char * path, const char * message){
  Serial.printf("Appending to file: %s\n", path);

  File file = fs.open(path, FILE_APPEND);
  if(!file){
    Serial.println("Failed to open file for appending");
    return;
  }
  if(file.print(message)){
      Serial.println("Message appended");
  } else {
    Serial.println("Append failed");
  }
  file.close();
}

void deleteFile(fs::FS &fs, const char * path){
  Serial.printf("Deleting file: %s\n", path);
  if(fs.remove(path)){
    Serial.println("File deleted");
  } else {
    Serial.println("Delete failed");
  }
}
De plus, nous vous recommandons de consulter notre guide des cartes microSD pour plus de détails sur l’interface d’une carte microSD avec l’ESP32.
installation()
Dans le setup(), nous devons ajouter les lignes suivantes pour initialiser la carte microSD :
Serial.print("\nInitializing SD card...\n");

Sd_spi.begin(SD_SCK, SD_MISO, SD_MOSI, SD_CS);

if (!SD.begin(SD_CS, Sd_spi, 55000000)) {
  Serial.println("Card Mount Failed");
}
Nous imprimons également des informations sur le type de carte microSD, sa taille et les fichiers actuellement enregistrés.
uint8_t cardType = SD.cardType();

if(cardType == CARD_NONE){
  Serial.println("No SD card attached");
  return;
}

Serial.print("SD Card Type: ");
if(cardType == CARD_MMC){
  Serial.println("MMC");
} else if(cardType == CARD_SD){
  Serial.println("SDSC");
} else if(cardType == CARD_SDHC){
  Serial.println("SDHC");
} else {
  Serial.println("UNKNOWN");
}

  uint64_t cardSize = SD.cardSize() / (1024 * 1024);
  Serial.printf("SD Card Size: %lluMB\n", cardSize);

  listDir(SD, "/", 0);
Ensuite, nous créons un nouveau fichier sur la carte microSD appelé touch_point.txt pour enregistrer les points de contact, s’il n’existe pas déjà. Nous créons également les en-têtes du fichier.
// If the touch_points.txt file doesn't exist
//create a file on the SD card and write the header
File file = SD.open("/touch_points.txt");
if(!file) {
  Serial.println("touch_points.txt file doesn't exist");
  Serial.println("Creating file...");
  writeFile(SD, "/touch_points.txt", "x,y,z\r\n");
}
else {
  Serial.println("touch_points.txt file already exists");
}
file.close();
Toujours dans le setup(), nous devons initialiser l’écran tactile à l’aide du logiciel SPI.
// Create a Softspi Object and set its SPI pins
tsSoftSpi = new SoftSPI (XPT2046_MOSI, XPT2046_MISO, XPT2046_CLK);

// Start the SPI for the touchscreen and init the touchscreen
touchscreen.begin(tsSoftSpi);
Enregistrement des points tactiles sur la carte MicroSD
Un autre changement que nous devons apporter est d’ajouter les lignes de code pour enregistrer les points de contact sur la carte microSD. Nous pouvons le faire avec la fonction touchscreen_read().
// Get the Touchscreen data
void touchscreen_read(lv_indev_t * indev, lv_indev_data_t * data) {
  // Checks if Touchscreen was touched, and prints X, Y and Pressure (Z)
  if(touchscreen.tirqTouched() && touchscreen.touched(tsSoftSpi)) {
    // Get Touchscreen points
    TS_Point p = touchscreen.getPoint(tsSoftSpi);
    // Calibrate Touchscreen points with map function to the correct width and height
    x = map(p.x, 200, 3700, 1, SCREEN_WIDTH);
    y = map(p.y, 240, 3800, 1, SCREEN_HEIGHT);
    z = p.z;

    data->state = LV_INDEV_STATE_PRESSED;

    // Set the coordinates
    data->point.x = x;
    data->point.y = y;

    // Print Touchscreen info about X, Y and Pressure (Z) on the Serial Monitor
    Serial.print("X = ");
    Serial.print(x);
    Serial.print(" | Y = ");
    Serial.print(y);
    Serial.print(" | Pressure = ");
    Serial.print(z);
    Serial.println();
    String touch_data = "X = " + String(x) + "\nY = " + String(y)
                      + "\nZ = " + String(z);
    lv_label_set_text(text_label_touch, touch_data.c_str());

    String sdMessage = String(x) + "," + String(y) + "," + String(z) + "\n";
    appendFile(SD, "/touch_points.txt", sdMessage.c_str());
  }
  else {
    data->state = LV_INDEV_STATE_RELEASED;
  }
}
Après avoir détecté le toucher et enregistré les points de données et la pression sur les variables x, y et z, nous pouvons les enregistrer dans le fichier sur la carte microSD comme suit.
String sdMessage = String(x) + "," + String(y) + "," + String(z) + "\n";
appendFile(SD, "/touch_points.txt", sdMessage.c_str());
Démonstration
Maintenant, vous pouvez télécharger le code sur votre tableau CYD.
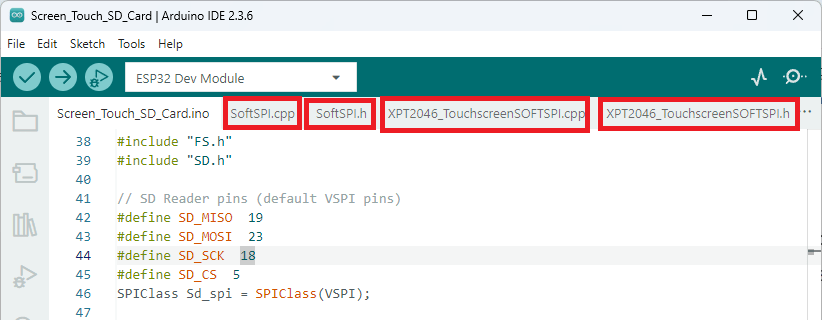
Assurez-vous d’avoir les fichiers requis pour utiliser SoftSPI pour l’écran tactile dans votre dossier de croquis.
Ces fichiers devraient être disponibles sous forme d’onglets dans votre projet Arduino IDE (sinon, cela signifie qu’ils ne se trouvent pas au bon endroit).
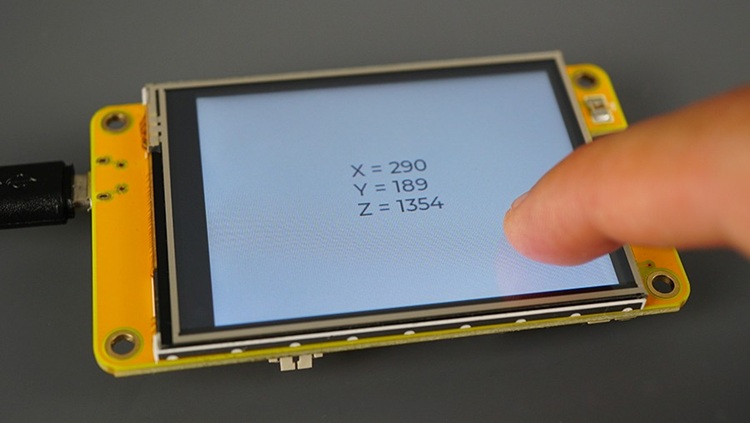
Après avoir téléchargé le code, touchez quelques points aléatoires sur l’écran. L’écran affichera les points touchés. Dans le même temps, ces points seront enregistrés sur la carte microSD.
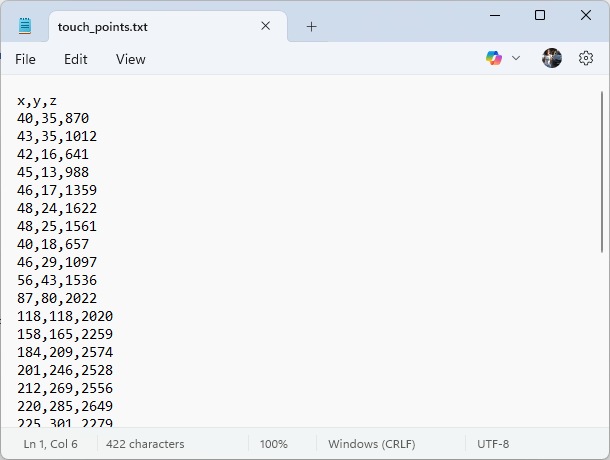
Après avoir touché quelques points, vous pouvez retirer la carte microSD du CYD et l’insérer dans votre ordinateur.
Il devrait avoir un fichier appelé touch_points.txt. Vous pouvez ouvrir ce fichier pour vérifier quels points ont été enregistrés sur la carte microSD.
Vous savez désormais quelles astuces vous devez suivre pour pouvoir utiliser simultanément la carte microSD, l’écran tactile et l’écran.
Quand vous n’avez pas besoin d’utiliser la bibliothèque d’écrans tactiles modifiée ?
Enfin, je voudrais préciser que vous ne devez utiliser la bibliothèque d’écran tactile modifiée que lorsque vous utilisez ces trois éléments simultanément : l’écran, l’écran tactile et la carte microSD.
Si la carte microSD et l’écran tactile ne sont pas utilisés sur le même projet, il n’est pas nécessaire d’utiliser la version modifiée de la bibliothèque tactile.
Conclusion
Si vous utilisez l’ESP32-2432S028R – 2,8 pouces 240 × 320 avec une carte CYD à écran tactile résistif, vous pouvez rencontrer des problèmes lorsque vous essayez d’utiliser simultanément la carte microSD, l’écran tactile et l’écran, car les trois composants utilisent le protocole de communication SPI.
Dans ce guide, nous vous avons montré une astuce simple que vous pouvez utiliser si vous souhaitez utiliser les trois fonctionnalités ensemble dans votre projet.
Nous espérons que ce guide rapide vous a été utile.
Si vous souhaitez en savoir plus sur le contrôle de l’affichage CYD et la création de superbes projets ESP32 avec une interface utilisateur graphique agréable, consultez notre eBook :
Cette vidéo vous emmène dans l’histoire de Raspberry Pi :

-
 Freenove ESP32 Affichage CYD Tactile 2.8 Pouces 240x320 Pixels TN 7789 | Microcontrôleur Embarqué à DoubleNoyau 32 bits 240 MHz avec WiFi+BT, Code C LVGL Exemple de Projets Tutorial
 -
 Freenove ESP32 Affichage CYD Écran Tactile 2,8 Pouces 240x320 Pixels TN | Microcontrôleur Embarqué à Double Noyau 32 bits 240 MHz avec WiFi+BT, code C LVGL Exemple de Projets Tutorial